Limited Frame-by-Frame Animation

Hello, everyone!! :slight_smile:

It’s such a long time since the last time i ask for things in this forum (and got such a plenty of help). 2 months maybe…?
And well, finally i did a lot of searching and testing.

So, apparently the “anime” thing that i always looking for to make was called “limited animation”. Which means it reuses some animations and limiting the frame usage as well (as far as i know). And it uses even less number of frames sometimes, which is what most of the Japanese animation looks like.

And i finally got a workflow that i pretty much desired… :smiley:

  1. Draw keyframes on paper, (yep, i got my table finally about a month and a half ago)
  2. Scan it to pc. I haven’t found whether i could resize it in scanning process yet (i drew all the keyframes in A4 paper, which is too big).
    If not, i’ll just resize it when doing the step 3
  3. Inking and coloring in Krita (lovin’ it!!). Resize first if necessary. It also supports add layer from an image file, which is useful for onion skinning.
    Also in this step i might end up drawing some variable frames. Like eyes in any gesture (close, open, half closed) as long as i need it.
  4. Export them on transparent background as .png
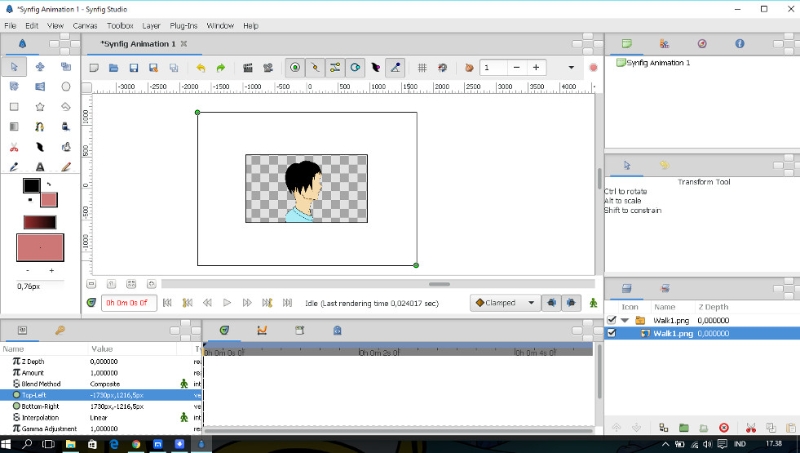
  5. Stack and set all the frames, keyframes and finally render
    That’s all for now at least. I just don’t want to go too far ahead. :slight_smile:

Now…
That step 4, is a total pain. :open_mouth:
At least it was. I was looking for a software that can actually do that task, and the results are a total NULL :cry:
The closest thing was blender VSE, but it was way too hard to navigate.

And then there’s a bit of a hope when i see this in the forum : image by image animation

That is just exactly what i need in this situation. Thank goodness!! :astonished:

This seems a bit needy or silly, but…
Is there any way to import a number of images at once ?
And also making sure that all the images i imported always have the same resolution as the original images itself (not too thin or thick) ?
Oh, also is there any other way to do it other than those three methods that was mentioned above (switch layer, perhaps) ?

yep… too needy isn’t it ? :blush:

But alas, i’m happy that Synfig studio just saved my day :mrgreen:

Hi!
How are you planning to do your inbetweens if your keyframes are png’s created in Krita? Bones and cut-out in Synfig? If you plan to do all your drawings, keyframes and limited inbetweens in Krita then you can group all your layers in a logical manner and use switchlayers in Synfig as an alternative x-sheet to determine what is visible at a certain amount in time.
Greetz!

Hello, darkspace!! :slight_smile:

Yep, that’s the one.
For the animating in synfig I’m thinking to either use the image layer and just change the directories in each necessary frame or just use the switch layer as you just suggested. Although the Switch layer method actually might do the trick better :slight_smile:

I also a bit worried about the scanned images. I’m using A4 size paper to draw all the keyframes. And when i try to scan it for the first time, the image resolution went too big, even for 1080p (3460x2433) :confused:

I’m thinking that the problem is in the scanner itself. I don’t quite know how to change the settings in it but the one that messes it up might be the DPI settings in resolution (it was set in 300 DPI)

Or if it is not, the only way to get through that problem is probably by:

  • resizing all images right after it scanned and before inking it (also still keeping its aspect ratio).
    Still haven’t quite found a program for that (irfanview could do the job though…)

  • Drawing directly from krita. It already release the animation version (it’s still beta) which is pretty sweet.
    Except that i’m not really into inking in Krita. I do have drawing tablet and i’m okay with inking on krita, but I prefer doing it separately,
    and only use krita to colour the keyframes if i could, for the nice feel and a better view in sketch and inking. (also for the sake of my eyes :cry: )

  • Find a new paper bundle and do the sketch and ink processes on it, So the paper can keep the resolution steady (no resizing).
    I only know A4 and A3 paper but that’s pretty much it.

Also, are A4 papers good enough or do i have to switch to A3 papers ? (just pretend that i’m making a 1080p Blu-Ray DVD animation clip)


I’ll just check the scanner’s settings again for sure :blush:

Hi!
If you ink your keyframe drawings in Krita, Gimp or even Synfig then the resolution of your pencil drawings does not matter. Then you can draw on a 12 field paper with a pegbar for alignment and scan at 150 dpi. If you wan to ink your drawings by hand then I would switch to 15 or 16 field and scan them at least at 300 dpi for 1080p, but I would recommend doing a small preview test before you start scanning 100 drawings, lol. Then you can color the inked drawings in Krita or Gimp and import the colored png’s into Synfig for further animation.
Greetz!

Okay, so i could scan it with 300 DPI. But how to make sure that the frame will fit in 1080p synfig canvas ?
I tried it a few times with 1080p canvas template (from preferences settings)
I imported my frame after scanned it with 300 DPI and ink & color it, but the frame turn out to be too big and it couldn’t fit in the canvas. :confused:
And resizing the image after it got inked and drawn could lead to some blurry frames
Should i resize the canvas or… what ? (i’m all out of ideas :blush: )

Also i searched a bit from the internet as well and found out that most of the recommended settings are 300 DPI, but i still don’t quite know the reason behind it. Like, what’s the risk if i scanned it with 100 DPI (even if it could fit in the canvas) :unamused:

And by the way, i decided to stick with A4 paper since it’s easy to get. But i might try the animation papers if i find one :slight_smile:

A bit more detail in my problem.

So the problem looks like this,

And the way i did it is like this:

  1. Draw the sketch
  2. scan with size A4 (exact size) and 300 DPI
  3. Ink and colour it in krita
  4. Export to .png without changing its resolution (as it was)
  5. Import it in Synfig studio with canvas size 1080p that i get from the preferences in synfig settings
  6. And that screenshot is the final result

As you can see the image oversized the synfig canvas (almost 4 times the canvas itself)
I need to know where i did wrong. :confused:

Hi!
Scale imported image to canvas size? Or do you get blurry lines then? Or cropping them in Gimp first before you import them. Also bear in mind that dpi is not the same as ppi and 1080p is 16:9 and A4 is not. You will have to make a layout on your A4 paper that would be roughly 297 cm - 167 cm so that your paper has the same ratio as your screen. When you scan that at 165 dpi you should get around the same size of the 1080p screen. Scanning at 300dpi would only be needed when you want to zoom in from, lets say 12 field to 5 field or so, to prevent pixels to show up. I think you can get away with 150 or even 100 dpi if you don’t zoom in but you will have to test that for yourself.
Greetz!

edit: document settings and canvas settings in Synfig are not the same. If you import a file that is bigger than the canvas then you have to either tick the box that says: scaling new imported images to fix canvas under edit/preferences/misc or adjust the settings of the canvas to the resolution of the image and tick image witdh, height and aspect in the other canvas properties.

Hello
300 dpi will lead to a high definition image, at a big size in PIXELS.

What I can say, is for example: On Inkscape, the usaul export resolution quality to PNG is of 90 dpi. If I export the PNG rendered on Inkscape at 90dpi, and say, that image has 500 pixels of width and 350 px of height, then I go to Synfig and setup the canvas to have 500 pixels of width, when exporting the image should fit to the Synfig’s canvas.

Before to export the 300 dpi image, make a copy, and keep the original in a safe place in your hard disk. With the copy, crop it an resize it to 1080x720 (i think) PIXELS, and export it to synfig if you want to animate in that VIDEO resolution. Now if you want to do ZOOM effects to that image, at some moment will look pixelated, because you changed the size.

I’m saying the same that darkspace65 :unamused:

— 300 dpi will increase the size of the image in PIXELS. You have to check the SIZE of your CANVAS and IMAGE size in PIXELS.

Hi!
From left to right, the same quick sketch, scanned in gray values 100,200 and 300 dpi, imported in Synfig as a png to a 1920-1080 canvas with auto-scaling and rendered to the same 1920-1080 setting. As long as you don’t zoom in there is hardly any difference between the three scans so I think it it safe to say that you can get away with 100dpi images unless there is a zoom in your storyboard. Then you have to adjust your dpi accordingly.
Greetz!

edit: If you plan on using skeleton deformation on pixel images then it is safe to say that it might work better on images with a higher resolution, but I have not tested that myself.

Whoa, thanks a lot for the suggestions!! :smiley:

Wait, i didn’t know that before…! I thought both are the same. :open_mouth:

Yes, i already know that. Quite a risk but probably not a gonna bug me that much.
The workflow that i planned on is to draw all the animations off the background a-k-a the plastic cells-like but on paper and a bit more digitalized.
That’s why i saved the keyframes in .png, so the background can be put behind it (or in front of it if necessary)

hmmmm… Create a layout ? How do i do that ? Printing them would work like a charm. But i’ll save that for later :unamused:

Yeah, that’s true, and probably not the best way to workaround on it :frowning:

Yup, that’s what i was keep thinking for the whole time (even until now).
DPI scanner setting was the culprit on my first try. 300 DPI X Paper’s width and height respectively, and realized that problem right after imported them to synfig (ouch… :blush: )

Gotcha!! I will keep that in mind. :exclamation:

Ah!! I get it now! So it’s for the zoom. Well, not entirely. But most of them need such a resolution to survive the zoom.

I might pass the 300 DPI scan though and create the zooming effects by hand (foreshortening effect). It will not give a smooth zoom effect but will give a more crisp animation in detail as a result. And the only way i could use the zoom effect is when the animation is viewing the scene and only be zoomed slightly (x1.11 percent perhaps ?).

Again, the workflow that i’m planned on is to replicate the plastic cell styled animation by drawing sprites off the background and draw the BG separately for a better resolution and size so it could be used for panning, zooming, etc.
It also look like animating sprites for a game. But this time, it’s for animation. :wink:

I did a bit more research by importing a sketch that has been scanned by 100 and 150 DPI on 1080p synfig canvas for comparison.
And here are the results:

100DPI.jpg

Quite a big difference. 100 DPI looks too small on canvas while the 150 DPI is quite slightly over the top (and bottom), but still tolerable for me.

So the best solution is just to stick with 100 or 150 DPI since 300 DPI is waaaayyy… too big.
Still it pretty much depends on the size of the animation that i am planning to make :mrgreen:

The same rules for tracing lines apply for the background images. If the BG is a pixel image then you need to increase its resolution when you plan to zoom in on it. Also bear in mind that traditional cells used in animation are not completely transparent. That is why you could not have more than 5 or 6 layers during the camera shooting phase. You can mimic that effect by playing with the opacity settings or the blend methods of the layers in synfig.
Greetz!

Exactly!!! :smiley:
And i don’t have any plan to do the camera shooting phase at all so no worries about that at all. :mrgreen:

Just scribble, ink then scan (or vice versa), color, and export to .png .
And for BG, i probably either use A3 paper with 100 DPI scan or A4 with 300 DPI, (ink if i have to) and color in krita, and save it as jpg… or png, depends of which one is more synfig friendly.
And everything should be just fine. :unamused: