Here is the first test of this character I’ve made. For some reason the playback on youtube looks really jumpy to me while the original file runs smoothly on my computer. How does it play for others?
it was a ffmpeg .avi 2000bps 1280X720
It took 100 years to render, I want it to work! lol
Mmm… I’m just a noob Synfig user, so I can’t be of great help for you. I think you could give some motion to the “C” part of the robot (the part that holds the spherical one), maybe rotating it a bit on its axis while the entire robot moves. And you could give some volume to the devices at the base of the antennas (unless you made them that way for a stylistic choice, of course).
We think alike. The plan was to put a rotation layer over the whole thing, so as it can wobble. I was at some point also going to point animate that “c” part. With enough work I could have that “c” do a 360 around the sphere if I want.
Then I have scanning and laser effect to come up with… would you believe all this was meant for a 5 second gag? lol
“Zutron the zany self-replicating alien prob” and the credit animations I just posted are all for a YouTube variety show. Absurdist comedy. The credits themselves are lampoons of the generic nature of entertainment.
Hey, thanks man. The only interpolation in the whole thing is “clamped”. I got that movement by moving the origin of the robot’s layer and by zooming that layer. The trick I found was to have the zoom and the origin waypoints staggered. This way the character is carving figure "8"s instead of zigzags.
Which light in the “the show” are you talking about? There are the circles as spots hitting the letters, then there is a region I use as the beacon that whites out the screen. I did at some point plan on having a “pop”, one of the lights go out and a tiny wisp of smoke. Perhaps a muffled “F()ck!” lol.
nice work on the texture for the head.
If you manage to make it repeat left-right, then moving the texture further away will look like the robot is doing a 360 turn, could be fun… and same for up-down if you want!
hope this helps.
Berteh.
oh!.. I think I even put a rotation layer over my “texture map”… is that the actual term for it? I must have just forgot. OK… So my next render of that will have a rotating texture and changed interpolation on the “eye”.
Thanks… feel kind of silly because must have just forgot to animate that rotation layer! lol
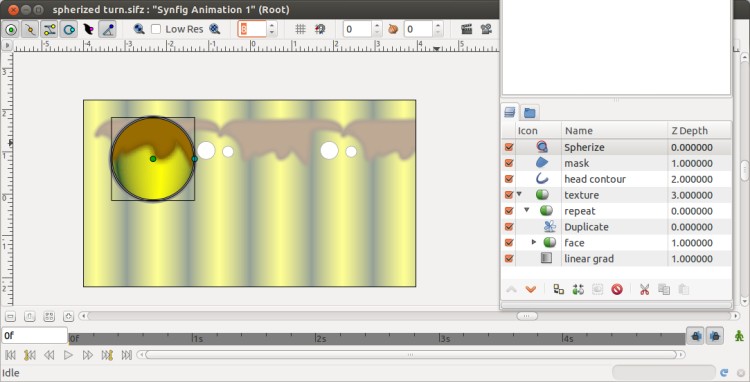
As I don’t know how you made your probe I could only guess from looking at the video that its “face” is actually a rectangular layer (I called it “texture” before) with a circular mask (maybe with “onto” blend mode, or “inverse” attribute set) and a “distortion-spherize” layer on top, matching the size and position of the mask.
If that’s the case then I thought you did achieve the effect of turning the probe’s head by moving the “texture” layer under the spherized mask, like I did in the attached file.
What I thought could be fun would be to have a background that repeats horizontally, so you could make it turn around completely, as in the video and file attached. Turning the head (or probe in your case) from one side to another is then as easy as moving the “texture position” handle.