Hello Synfig forum,
This is my first post. I’m a total beginner at Synfig and animation in general. I am eager to learn and have already spent some time researching the manual, forum and youtube tutorials as well as experimenting with the many features. If I am writing here today it’s because I’m stuck. Before I tell you my problem, I would like to share my enthusiasm for this wonderful software and thank all the developers and contributors to this project for making this very powerful tool accessible to all.
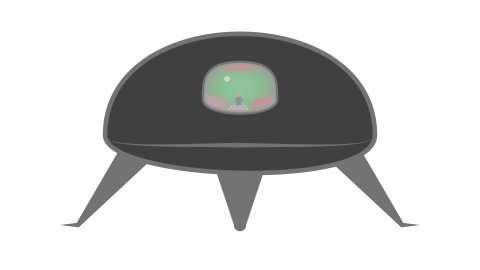
I am trying to have a character sit inside the glass cockpit of a flying saucer and later on having him get out from his vehicle for the rest of the animation. I have problems with those two things.
1°) Having the character sit in the cockpit
I have 4 elements in my flying saucer group layer:
-the man (“M”)
-the glass cockpit (with 0,5 opacity) (“G”)
-the inside of the spaceship which you can see through the glass cockpit (“I”)
-the exterior of the main body of the spaceship (“S”)
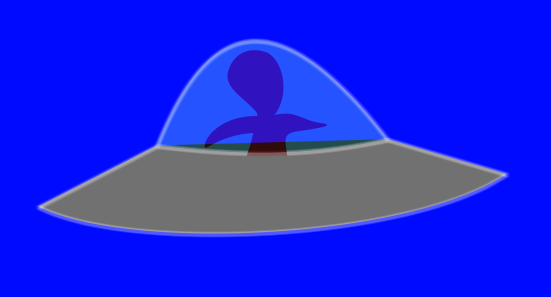
The problem is that I need to have
S > M > I
i.e. the man is behind the ship and in front of the ship interior.
as well as
I > S
i.e. the layer representing the inside of the ship covers the exterior of the ship (I have achieved this using the “onto” Blend method).
This seems impossible. The interior cannot be underneath an object (the man) which is itself underneath an object (the ship) that is below it. However, I imagine there must be a workaround because this situation does not seem far-fetched and Synfig has an impressive set of tools.
I tried every possible combination of grouping layers and blend method I can think of. There are two possible solutions that I came up with but they have flaws.
a) Having the junction between the cockpit and the ship be horizontal. This way there is no interior to be seen and I can just put my character behind the whole flying saucer and he will appear right. However, this would be a shame because the ship really doesn’t look as good this way! And I’m sure this situation will come up again often.
b) Grouping the Man and the Glass cockpit, having the Man in front of the cockpit with blend method “onto”. This is very close to what I’m looking for and I think I’m just missing some tweaks to make this solution work. The problem is that the man becomes transparent like the glass. Is there a way to use the “onto” blend method without being affected by the opacity of underlying layers? About "onto’ blend method, the manual says this: “the transparency of the resulting color is set to be the same as the transparency level of layer B”. Which makes me loose hope!
2°) Having the character leave his ship and walk on a planet
Is it possible to have a layer leave a group during the animation? Once my character leaves his ship, he needs to be independent from it.
I haven’t yet started to look for a solution for this one because I’m still struggling with problem no. 1. But I’m thinking ahead and I can’t really think of how to do this.
Are those things impossible in the current state? If so, I will work with it but I would like to know.
I apologize for the length of my post. I have spent a lot of time trying to find a solution and to understand and to write this post. I’m sure everyone has many other things to do, so many thanks to anyone who can help me through this. I understand that I have a lot of studying to do before I’m comfortable with Synfig’s concepts but I’m trying to learn along the way. And honestly the manual isn’t always very helpful, as it is quite incomplete and sometimes out of date. I understand why that is and I totally accept it but this is why I resort to calling for help here.
Cheers