Howdy,
Just wanted to show what I’ve been working on lately. Here is the character Wander from the short lived Disney series Wander of Yonder. This is my first honest attempt with the skeleton tool and while I’m being honest I’ll admit that this is less of a character rig and more a pile of vertexes mercilessly beaten into the shambling vestige of a decent walk cycle. Regardless, feel free to scoop it up and do whatever with it cuz god knows Disney won’t ever touch this show again. I’m hoping to improve the rig moving forward, so I’d love to hear any feedback and suggestions
It was challenging trying to use the skeleton tool with Wander’s noodley limbs since there are no clearly defined elbow or knee joints a lot of the time. I did a bunch of extra work tweaking bones and limb nodes to fit the limbs in the reference
Wander’s hat is made up of 2 groups, one group for the parts in front of his head and another group for the parts behind. I wanted to link them together, but I had to choose between that or linking them to the head bone. I ended up using the bone link and then animating both hat groups by multi-selecting the origins which was a pain because origin points are immune to the selection box. Any suggestions?
The smooth-moves tool was my best friend for this animation, however all that vertex manipulation comes with it’s own challenges. I had difficulty reusing poses and shapes because I could not duplicate recursively from the group canvas parameter or in bulk from a multi-selection. I had to duplicate each element individually.
I spent a lot of time fixing line connections at the object interfaces at his wrists and ankles. Maybe there’s a better way to structure it to avoid the extra work, but I don’t have any ideas at the moment.
The original animation is generally bouncier than my re-creation. That is to say there is a higher degree of easing between key poses compared to my version. Since the curve editing interface does not currently have functionality for recursive editing on groups or bulk multi-select editing, fixing this requires frame-by-frame tweaking on in-betweens as far as I can tell.
I ran into some trouble when manipulating keyframes to tweak timing. The reference animation was also affected by the adjustment but it took a while before I finally noticed so I had to go back and redo some parts. I suppose that exported canvases are the intended solution for this kind of issue, but in my case, I needed to animate in context to follow the reference frames so it was not an option for me.
I used the current development version of Synfig.
(are the gifs static for anyone else?)
Wow! Super accurate movement! And what’s more mind-blowing is you did that using Synfig!!!
If I were to go through this exact painful effort replicating fluid-like animation like yours I already know what comes next; RIP Synfig + lots of cursing along the way.
Amazing work!
Personally I avoid using bones at all costs but it’s nice to see you can do something impressive with it without it leading to crashes and corrupted files.
Don’t users usually have problems editing already exported values? For example imported bones in another synfig file has proven to be a total nightmare leading the user to edit sif file by hand. Also, IIRC @KonstantinDmitriev already mentioned Synfig bones are just exported values. So in this case we are dealing with two exported values (one linked group and another a head bone)
Right, you’ll get corrupted file if you copy-paste any part which is linked to bone from one file into another (in this case the latter file gets corrupted and you can’t reopen it after closing).
Also, copy-pasting bones from one file to another is not safe.
If you avoid those operations then bones are safe to work with. This issue will be fixed in the future versions.
No, this is not a bug.
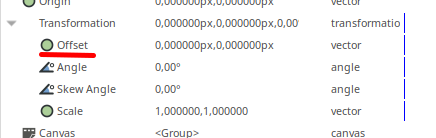
Please consider that “origin” (Offset) parameter of a Group Layer is a child of Transformation parameter.
When you link to a Group to Bone, then it converts the whole Transformation parameter into “Bone Link” value node. Thus, Transformation losing all sub-parameters and their links.
 Re-creation
 Reference