hi all,
i’ve recently used synfig to create some simple spline animation, and was very impressed of synfig.
but one little thing was annoying. it was the time offset parameter.
after finishing my animation, i wanted to modify the length of some animation. i googled for a solution, and found a tutorial about time offset(here on the wiki page). it worked well, but i think it’s to comlicated…
even doing some simple thing like changing an animation form 24 frames to its double duration, was a pain until i knew how it worked.
as a suggestion, i could imagine a tool, which lets you mark a start and an end position, and scale the frames between.
i don’t think animators want work like that: "hey i want to scale that part of the animation a little bit down. so lets do a some maths for this offset parameter… "
i hope you get what i mean, english isn’t my first language
Yes I agree. It would be cool to have some sort of interface to allow to the user define the animation length of a inline canvas… Any suggestion on the interface design?
mhh my suggestion would be to create a new tool, something like the standart select tool.
with this tool you kann shift-click to mark the frames you want to scale, and then scale them by clicking and move the mouse up and down.
maybe it could look in a way similar to this: yfrog.com/j9interfacetj
maybe on the “tool option window” could be a box, which contains the faktor of the multiplication (“2” for double length, etc.)
(after editing, Esc-button could unmark frames)
A relative feature (perhaps too different and should go into a post of it’s own?) I’ve missed from pretty much all animation apps is rubber-band moving of keyframes. A feature where you set edit points and the keys are shifted relative to the dragging of these points.
Set edit points, as many as you like.
Drag a point, the keys are shifted relative to this. In this example keys behind the middle one is compressed and the ones before it is spaced out.
Guys!
all the things that you’re asking already exists on synfigstudio!!
There is one problem only. It has to be done in an exported canvas but I think that it is not a big deal IMHO
I’ve prepared a sample file:
The file has the following layers:
Paste canvas exported (star)
Star
Region
Circle
Solid Color
How did I create them?
I created the Solid Color, the Circle and the Region normally.
Then I animated the circle (sun) movement with three keyframes: 4f, 2s14f, 4s20f
Also I animated the circle radius with several waypoints between the keyframes.
Later, in not animation mode I created the star. Then I encapsulate it and exported the canvas parameter of the star and called it “star”.
Then I opened the exported canvas in its own window. The exported canvas has its own timeline!!! And so it has its own keyframes.
In its own exported canvas I created some keyframes and waypoints moving the star. The result is in the file “shiftkeyframes-sample.sifz”
There are some interesting things:
Keyframes of the exported canvas is not shown in the root canvas and viceversa
Edition of the star layer in the root window is possible and the keyframe locking responds to the exported canvas keyframes (as expected)
Edition of the Paste Canvas layer parameters responds to the keyframe locking of the root canvas (as it belongs to that canvas)
Now comes the trick:
I want to modify the star animation in terms of compressing or wxpanding the waypoints. Just open the exported canvas by double click on the canvas panel and edit the keyframes positions. When you click and drag a keyframe widget (it is in the timeline) the intermediate waypoints are compressed and expanded on the corresponding side.
Dragging the keyframes on its own canvas doesn’t affect to the root canvas keyframes or waypoints. The modified file is attached too.
What I miss is a way to edit the keyframes of the exported canvas watching the rest of keyframes and waypoints of the root canvas. That would make easier to sync things. Maybe it can be possible to show and allow manipulate the keyframes of the exported canvas meanwhile we have the root canvas selected. It should happen when the paste canvas layer is selected. Maybe the internal keyframes and waypoints can be drawn in other color or shape? with a red dot inside?
-G shiftkeyframes-sample2.sifz (2.26 KB) shiftkeyframes-sample.sifz (2.24 KB)
mhh wanted to post an example file, but confirmation email hasn’t arrived yet
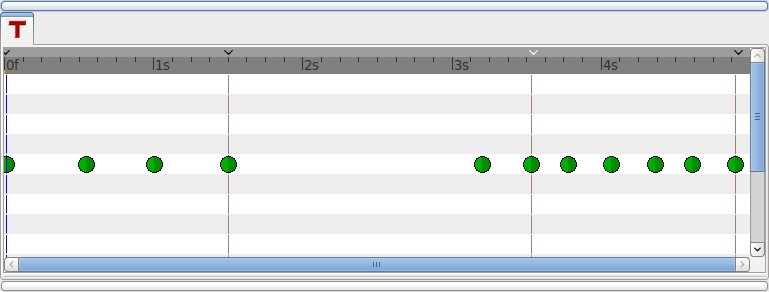
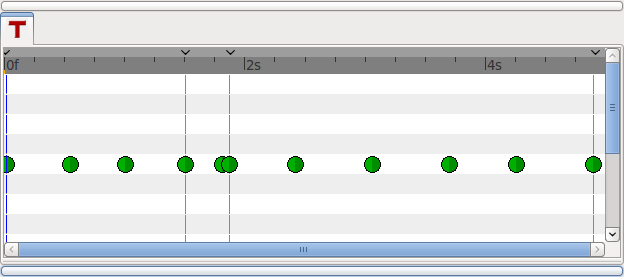
ok i understand how the keyframes work, but imagine an animation with a key on 1s 2s 3s and 4s
so time between each key is 1s. now i want to change the time between the 1st and 2nd key to 2s, but also shifting the following keys back.
so that i have the keys at 1s 3s 4s and 5s after rescaling.
how can i do that?
What you want is modify the length of the keyframe at 1s. The keyfrme at 1s has an initial length of 1s (2s-1s=1s). You can do it by editing the length of the keyframe at 1s by double click in the keyframe length in the keyframe panel and entering manually a new time length there. Also you can CLICK+ALT drag the keyframe at 2s which will modify the length of the previous frame (that is the keyframe at 1s). The effect is that the length of the keyframe at 1s modify its length and all the keyframes at the right of the keyframe at 1s keeps its length (and modify its position).
Notice that both features (edit the keyframe length and alt-drag the keyframe widget) are only available at version 0.62.00.
Keyframe widgets are the small vertical black arrows in the top grey area of the timeline.