Hi! i’ve just finished the front design of my main character, and im looking for critics about the design and the order of the layers within the file (what is the best hierarchy to make more easy animate later)
and i have a couple of questions??
how can i link 2 vertex of 2 different layers, i’m mean like when you draw a bline there is the posibilitie to have the outline and the region, and those 2 layers are linked, there is a posibiliete to link, for example 2 outlines, how? (this is to make the shadows, or there is a better way?)
and, can i import video??, because i want the background to be made of video (scale models), so it would be easy to integrate the characters with the background, can i??
It is very cute!. Good drawings. About the layer order it depends on the kind of animation you were going to do. Is the character going to cross the arms from back to front? is it going to simply talk?. A normal hierarchy for most of the cases is:
Character
*Left Arm
**SLeeve
**Left hand
*Head
*Upper Body
**T-Shirt
**Body back
*Left Leg
*Right Leg
*Right Arm
**Sleeve
**Right Hand
But keep in mind that it doesn’t exist the “all in” one set up.
To link two vertexes from two different layers (whatever two layers that have a vertex) you have to select both layers at the same time: CTRL + left click. Then you have to select both vertexes at the same time: CTRL + left click (both become highlighted). Then over one of them do right click and select “Link”.
To produce shadows you should use the Shade layer. Create a Shade layer over the layers you want to have a shadow and set its blend method to “Behind” to set the shadow behind the object(s).
Yes you can, but the best way is to previously export the video to a image sequence (using other application or synfig itself) and then import the image sequence using ListImporter layer. If you have installed ffmpeg you can import an avi directly (File>Import) but the seek performance is very poor. So for better performance you have to import a image sequence using the ListImporter Layer. See synfig.org/ListImporter.
Oops! I mislabeled the Right Arm!
belifilmaker: it is just a question of organization. Most of the people draws the characters looking 3/4 right or left so the limbs and body stack should be consistent with that. But I repeat, it depends on what’s the pretended animation. Doing a storyboard helps heaps to organize the animation in small chunks (or shots).
hiii i have using the vertex link, with no problems. thank you!!
about the shade , i just dont like the efect i prefere more control , but i’ve downloaded a file of the morevna proyect, one with a hand, and i see that the shadows are made with a black region a 50% opacity in multiply and i thought that was a cool way to make the shadows, unfotunately i knew that after i made all the shadows, and i get a diferent color than the one i used, so, at least for this character i will do the shadows with the vertex link
about the hierarchy i will do that to the other position of the character, because i tried to, but after 2 hours i give up, it was just a mess . About the storyboard i haven even finish the story so, i cannot make the storyboard…
about the ListImporter, someone knows a stable software that can do this (change a video file into jpg images)??
and another couple of questions, why synfig crashes all the time without warning? is there somewhere a preference to change, i dont know, the limit to the amount of cpu used on synfig, maybe?, or i dont know, maybe there is a version of synfig on a liveCD with just the OS and synfig??
there is the posibilitie to mix 2 layers, to merge 2 or more layers into 1?,
or to, for example if i draw a circle with four vectors, and i make the outline, can i select 2 of those vectors to set a limit of what i can see of the outlined circle (meaning that if i draw the circle with 4 vectors at the same distant, and i select 2 of those to ‘‘cut’’ the line i could draw with the same vectors a half of a circle outlined)
2.1)why i see that white spot, that looks like a white pixel, on the jacket of the girl (and is not a dead pixel of the screen, because i move it around and the white ‘‘pixel’’ follows), even after i have remade that part of the jacket, an on the same place???
another 2 question (i feel like i’m abusing of your good will (i’m sorry but i need this) )
2.2) how can i get a gradient inside a region, like this, the faces of the 2 kids, i only manage to get a square gradient layer with the tool
2.3) how can i split the vertex tangent after i have made the original design??? because i can add a vertex (smart) but i dont know where i have to press to split the tangents, where??
There is not unique rule to do the shadows. I thought you were asking for drop shadows. For shade the object the best is to place a 50% dark region multiplied, yes, but any other solution (with link vertexes too) should work.
Please provide OS and Synfig version. If you are under windows you should follow this workaround. Current version 0.61.09 is pretty much stable even in Windows. Follow the video installation using the latest version.
if you want to merge two blines into a single one there is not quick answer. But you want two or more layers as one group of layers by encapsulating them into a folder (as you actually now). The only tool that merges two blines during its construction is the Draw tool. Selecting the proper option in the option panel it add points to the existing bline. I guess that you want to select a lot of blines with a single click and your first idea is to merge all them into one single one. But there is a feature in Synfig that can help on that: Groups. If you look to the Group panel (the one with a green opened box as icon) you can do the following:
Select the layers you want to “merge”. Right click on one of them and select “Add layers to new group”. Give it a name to the group and it would appear in the Group panel. Later when you want to select all the layers at the same time just do double click on the named group in the Group panel. All the layers contained by the group will be selected. Now edit them all (ducks position and common parameters only) as a single one. To edit the non common parameter you have to select them individually.
To produce the result of the right part of the image you have some options:
Reduce the width of the bline at certain vertexes to make the bline disappear between those vertexes
Draw a Region and a outline separately and sew them properly. For example, draw a region with four vertexes and a outline with three, then sew one by one the first three vertexes of the region with the outline. See this page. I hope some day we can do that with an aid from the GUI.
Please provide the sifz file to be able to reproduce it.
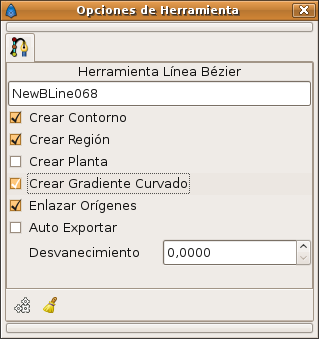
There are some options to create gradients with the Gradient tool and with the Bline tool. See the screen captures. Anyway you always can insert any kind of gradient layer by Caret Menu>Layers>Insert New Layer>Gradient. In fact that’s the only way to insert a noise gradient.
Right click on the vertex origin and select “Split tangents” or
Move the tangent duck and press the SHIFT key at he same time or
Expand the BlinePoint and search for a “Split tangents” boolean parameter.
It is worth to take a look to the wiki. Some of those questions are solved there. Anyway you’ll learn quickly to use the right button of the mouse…
yes i have the 0.61.09, on windows, and on one core of 32 bits, i was asking that, because i remember a problem that i have when i started to work with adobe after effects, by default it has a weird option turn on of using the 120% of the cpu. so, i dont know, i thought that maybe the problem could be something similar.
thank you! i’ll check that
thank you!, i didnt know that i could reduce the width of the outline at certain vertex,
with this two i have the same problem but is only because i copied the original and change the view, i’ve upload them just in the case the problem cannot be reproduce in the first one.
2.2) thank you!, and i´m sorry but i’ve figured out before i read this (i know those tools), the trick was to change the blending mode of the gradient layer into ONTO
2.3) jajajajaj thank youuuuuuuuuuuuuuuuuuuuuuuuuuuu!!!, i dont know why i couldn’t see that option before, jajajajjaja even do i was looking in that menu beeeeeeeeeeeeeerrrp! thank you!!!
yeap i always check the wiki before i ask here, jajaja is just that sometimes i don´t know exactly what word should i search
hi! it seems that the white spot is only for the preview, not for the final render. so at least it ain’t deadly, btw i keep seeing it in those 3 files…
i’ve made a test composite with nicole (the synfig character) and an old background of a previous animation i made the 2007 and remastered early on the 2008.
a question : on synfig there is something similar to the masks that you can use in after fx, a region where you can change the opacity (transparency-amount) of the layers that are under the mask, you can change the shape of the mask and the feather of the mask with keyframes, there is a tool like this on synfig???, i´ve been looking like crazy but i don´t no, maybe it has another name…
Alpha over does that.
Remember that regions can be inversed so you can apply a inversed masks.
Region (Blend Method=Alpha over) Set the amount of this layer to 0.8 for example. Invert it.
Stuff (only the stuff that is under the region is visible. Visible with an amount of 0.2 = 1.0-0.
It is not the ‘+’ from the num pad. It is the one from the keyboard.
Also the zoom out is not the ‘-’ but the ‘_’ so you have to press CRTL+SHIFT+’-’ in the non num pad key. Annoying yes.
-G


 O.O?
O.O?

 thank you!!
 , but i’ve downloaded a file of the morevna proyect, one with a hand, and i see that the shadows are made with a black region a 50% opacity in multiply and i thought that was a cool way to make the shadows, unfotunately i knew that after i made all the shadows, and i get a diferent color than the one i used, so, at least for this character i will do the shadows with the vertex link
  . About the storyboard i haven even finish the story so, i cannot make the storyboard…
 i’m sorry for the amount of questions


 i always check the wiki before i ask here, jajaja is just that sometimes i don´t know exactly what word should i search
 : on synfig there is something similar to the masks that you can use in after fx, a region where you can change the opacity (transparency-amount) of the layers that are under the mask, you can change the shape of the mask and the feather of the mask with keyframes, there is a tool like this on synfig???, i´ve been looking like crazy but i don´t no, maybe it has another name…
