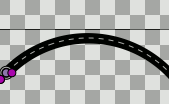
Draw a closed curve with the Advanced Outline tool (I happened to create mine using the circle tool). Now suppose you’d like to animate it being drawn. Piece of cake: all you have to do is set your width point positions to 0, then animate one of them increasing from 0 to 1. (You also need to change the “Side Type Before” and “Side Type After” parameters on the width points, but I assume whoever is reading this is at least an intermediate-level user.)
Ah, but there’s a problem. The curve always starts and ends at the same spot. For my circle, it begins and ends at -90 degrees (if we’re plotting it on the Cartesian plane). What if I want it to start and finish drawing at a specific point? For the rest of this post, I’ll pretend I want my circle to start on the x-axis.
One common-sense solution would be to start both width points at .25, then animate one of them increasing to 1.25. Alas, Synfig doesn’t like it when you exceed the bounds of the width point positions and merely caps out at 1 (or whatever you set the upper bound to). One possible workaround is to subtract 1 when the width point position exceeds 1, but that’s inelegant and can be difficult to edit if it needs to be changed.
It would be nice if Synfig internally handled width points like so:
- Are the width points set to the same position? If so, display nothing. (This could also include situations where width point 2’s position is less than width point 1’s, though I don’t think that’s necessary. Perhaps one or two options could be added that alter whether something or nothing is displayed when the width point positions are not in strictly increasing order. Anyway, none of this is all that relevant because I’ve done it manually using a constant waypoint for the Amount parameter.)
- If the width points are not set to the same position but within interval of each other, add or subtract interval from their positions until they are both between the lower and upper bounds. Here, interval is the upper bound minus the lower bound. Once between the bounds, draw the spline from the lower valued width point position to the higher valued one (or not, depending on the options I outlined above).
- If the width points are not within interval of each other, draw the complete spline.
If I’m not mistaken, this would all be pretty consistent and intuitive and allow for nice, continuous editing of parameters.
A simpler but less user-friendly way of changing the outline’s start point is to add a parameter that defines in absolute terms the spline’s starting point. This is what I thought the “Lower Bound” and “Upper Bound” parameters did, but all they do is change what values the start/end points map to, not physically where those points are.
Am I missing something? Is there a simple way to alter where the line begins drawing such that I can smoothly animate it going from start to finish?
As for my project, well, I have a pretty simple workaround. I’m working with circles, so I just rotated the circles by the amount I needed to. I’d still prefer a way to change this in the Advanced Outline parameters if and when I’m working with non-circular outlines.