Just here to share a thing, and ask a some questions about it
so, i explored all the wikis about outlines and found out that normal outlines have its own width, and they all placed right on their vertexes
and i was thinking, “does this works in advanced outlines too…?”.
Well, i mean, it’ll make my drawing easier since i can add splines while drawing and the width points are still in place anyway (right on the splines’ vertex)
So i tried it on advanced outline, and…
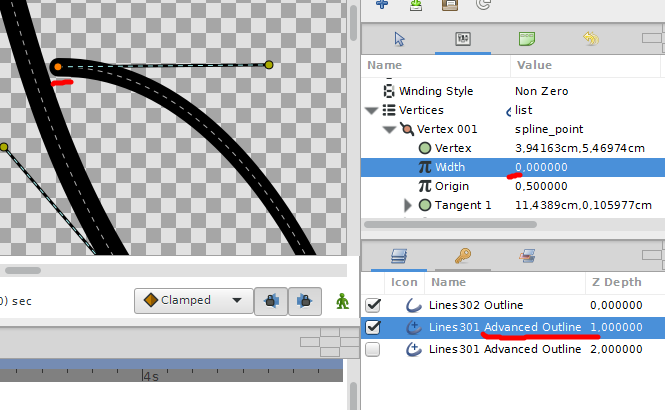
the “width” parameter for each vertices does exist, just like in the normal outline parameter,
but as you can see… even setting the width to Zero doesn’t change it at all
So here are my questions :
does that count as bug, or not implemented feature ?
if that’s a bug any chance it’ll be fixed ?
if it’s not, that’s fine. like, if that works, the whole outline layer will be filled with total jumble mess of width handles
Hi!
An advanced outline only comes with two default width points. They can easily be moved to the outer vertex of each spline. How can you make a mess of that, lol.
Greetz!
The ‘Width’ parameter in ‘Advanced outline’ doesn’t do a thing. The whole stuff was moved to its own group - ‘Width Point List’. I guess it was done because width in adv. outlines is much more complex than in a normal one.
So try checking that group, but keep in mind that all points are related to the first vertex. For example, if you set ‘Position’ of all width points to zero, they’ll move to ‘Origin’ of the first vertex.
P.S. I don’t know your workflow, but you can have a one big adv. outline with only, let’s say, 2 vertexes and multiple width points. Might be useful in some cases.
well i was about to post this in the “Finished Works” section, but might as well put it here for easier explanation Practice.sifz (191 KB)
that was my first time actually completed a drawing, also learning on the mechanics of synfig. so my apologies if it doesn’t look very pretty
if you check the linearts closely, those were made from a lot of adv. outlines, some of them were made with exactly one,
that’s because i use them to make some details like folds, drapes, etc accurately.
But when it comes to filling them, it’s really tricky and time consuming
so to make sure it’ll be way easier to fill in those areas, i want to draw them within one single outline instead
and it does work well
But the difficulty pops in when i have to add another vertex inside those lines to fix some parts, which will move all of the width points away
Looks at that complicated work Well, I am out of here.
The artwork is super impressive, though
I’ve experimented with it a little and let you know that we’ve lost this battle against vertexes and their evil tangents. I am really sorry, man.
The problem is that after you ‘Insert item’ the ‘Position’ of width point is not changing. It’s still the same, but visually you see the transformation. This means, we have to re-calculate it according with insertion of a new vertex and that’s not worth it. Maybe fire up a feature request?
well, thank you!! It was totally mesmerizing, but very worth it as well
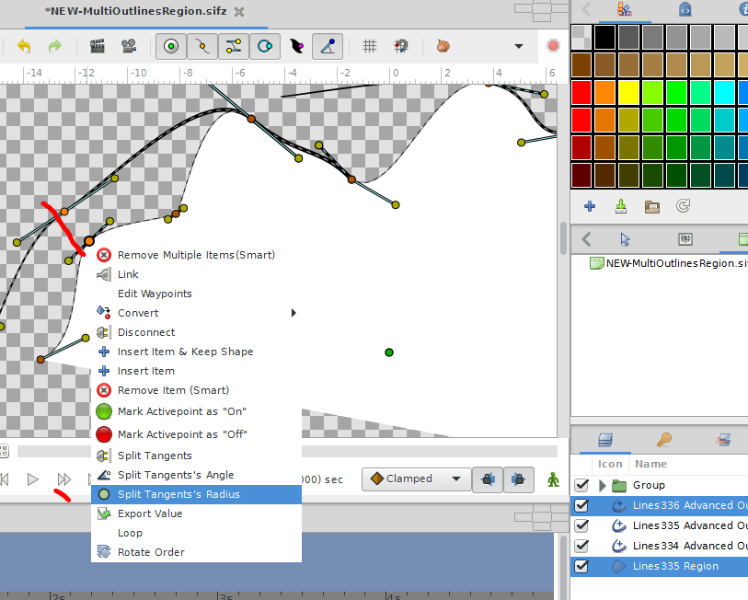
it’s okay. I actually found a better way to do it, but it uses many outlines as substitutions instead, :
if you only keep the region’s spline tangents radius Split up (and keep their angles’ merged) then link it to respective outline’s vertex and tangents point, it’ll link more properly and less buggy when you split the outlines tangents, making fixing those mistakes much easier
just make sure you don’t link them with the region’s spline tangents fully split or with only their angles’ split up, just their radius
and to add more lines, dupe that outline, disconnect its spline points from Vertices list, arrange it, “Insert Item” from Region, “Split tangents’ radius”, rinse and repeat
i’m not quite 100% sure of this method, but i have experimented this many times around and mostly it works well
Hi!
I like your drawing. Nice detail. Must have been tons of hours you put into that. If not finished already then you should finish it and post it in the finished works section, because it is a showcase of how Synfig can also be used primarily as a drawing program. I also use your second technique to glue one region to different outlines, if I feel the need to do so, but there definitely should be a future option where you just select several outlines and then make one linked region under them with just one click. I wonder if using an extreme amount of advanced outline makes Synfig slower then if you use the same amount of normal outlines.
Greetz!
Thanks!! it actually took really long time, about 2-3 weeks plus learning the curves
i’ll try to finish it very soon, it needs a bit more detail
also i’m working on another one, with the same problem as the first one (haven’t found this method yet at that time), so it’ll take a while
yeah, that would be something really good, but will totally need a lot of codes and calculations to put in them
or it’ll end up like this…
Hi!
An advanced outline only comes with two default width points. They can easily be moved to the outer vertex of each spline. How can you make a mess of that, lol.
Greetz!
well… the point was to change the widths directly without the use of the handle, because the parameter is actually there (resembling the similarity to the Normal Outline)
but then, it’s not possible to do so, and the discussion ended up with that conclusion