2D animation - Pencil, Inkscape and Synfig

Hi guys,

Well I finishing a new 3D animation with blender, and between the render process I am building a 2D animation with Pencil ( Rafs and storyboards), Inkscape for Vectorize and Synfig for Animation, The final edition will be made in Blender ( Sequence editor ).

Well, here some screenshots:

Thanks, I am linking synfig a lot. Great software!!

It looks so good! Please keep us aware of any progresses.

Just a question: Inkscape is part of the animation process or it is just for vector art? In your work flow, do you use the SVG to SIF converter?. I would like to know the needs of an animator in a complete animation pipeline.
Would you be son kind on explain a little more the process?
Pencil>Inkscape>Synfig>Blender

Cheers!
-G

Hi, Genete

Well,Iam working now at the project ( I am waiting a long render in blender…). Inkscape is just for vector art.
I will explain the process an why this.

I am using Pencil for the sketches because it has “onion skin” and when I play the file I have a “realtime” playback, so for timing the animation and test the keyframes …pencil.

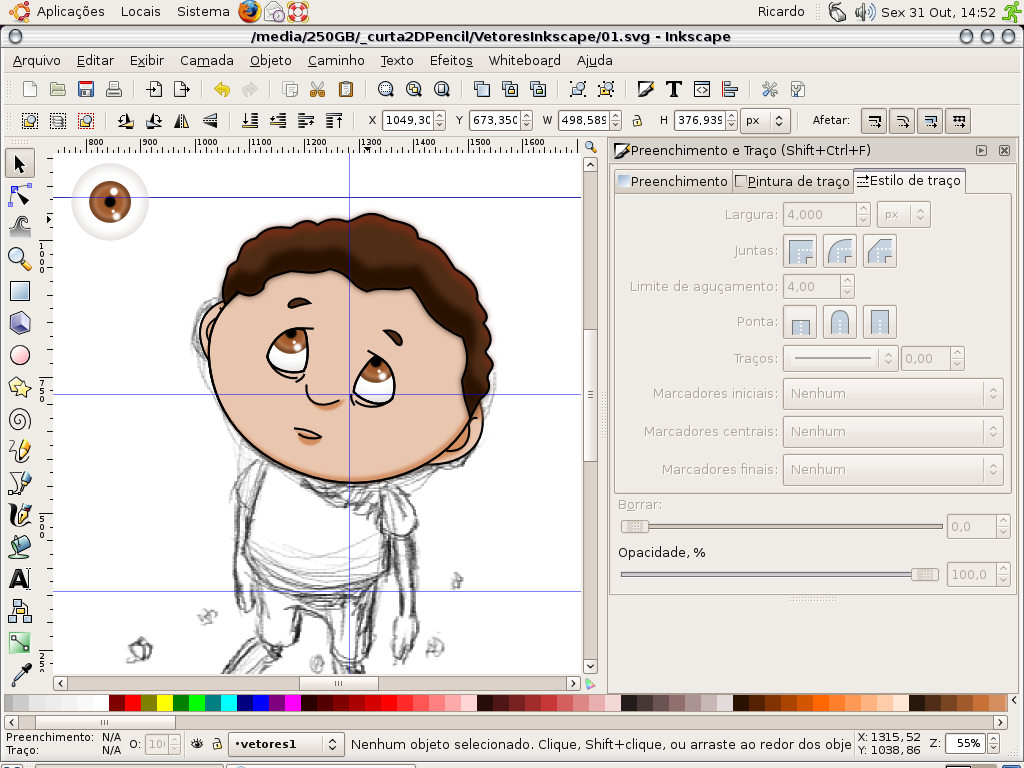
After the drawings using Pencil, I just import these bitmaps inside inkscape and I use the bezier to vectorize the draw. I use inkscape because The tools are simple to use, I had some problems with Synfig. But I don’t Know, maybe I’ll try to vectorize some other scenes inside synfig.

After vectorize with inkcape, I just export the bitmaps of each part ( arms, legs, head…) with a High resolution, so I can import in Synfig.

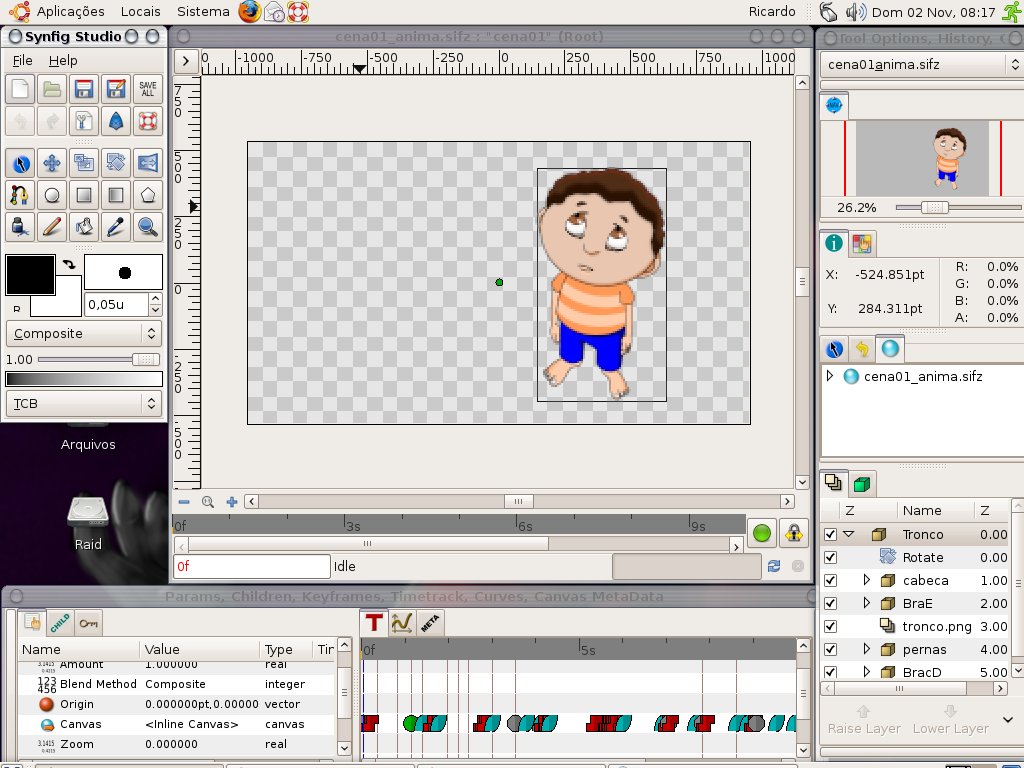
After import those parts in synfig I use encapsulate and transform tools for cut-out-animation. ( each scene has a different file). I render the scene and then…

I’m importing .png sequences, exported from synfig, to blender ( the sequence editor is great ). I could use cinelerra too, but blender imports sequence of images as a unique strip, so I think its better for .png sequences, and uses a “proxy” for images ( it creates a low resolution copy to improve performance during playback).

For now, I’m vectorizing more scenes. At the middle of the next week I’ll have more composed scenes to send you ( here ). I just sent this one because I liked a lot the result ( I took about 2 days working about 2 hours ).

Well, I had used toonboom and anime studio before ( in the past ) and Synfig is very good too.We must work a little bit harder with the interface ( it’s not a user friendly ) , the performance with playback is not so good too, I thnik a onion skin would be great too.

But I’m using Synfig and liking it! It’s a great software. For now on, I’ll just use it. I want to produce all of my future works with open source software. Synfig is in my list. And if I can help on this…I’m here. This project will be finished soon and I’ll send you all my notes about problems and goodies.

Good luck and…good work!

Thanks for the reply Ricardo.
I now understand the roll of Inkscape in your animation process. It is interesting that you say that have some problems with synfig drawing tools because I haven’t and I’m specially clumsy on drawing.
Maybe you just have to give an opportunity to synfig and I’m sure you’ll be so satisfied. There are some tutorials that you might want to do to fully understand how synfig works. Once you get comfortable with synfig you can directly trace on it and use the full tweening capabilities of synfig.
Meanwhile, to continue with your current work flow (cut out animation) please read this tutorial. Maybe it helps you.

Last, please update your synfig version. There are much more improvements, stability and less bugs in the last release. You need to build it from source code. Contact us if you have problems to build it on Ubuntu (a good place for that is the IRC channel). I use Ubuntu and don’t have any problem with building synfig since 6.10. I’m on 8.04 now.

-G

Very nice work!

Synfig does have onion skin. Based on the code it appears to be keyframe based rather than time based. There appear to be a few commented-out lines in the code (src/gtkmm/workarea.cpp 126 & 422) that can be re-enabled to make it both keyframe and time based (one second before and after the current frame). These have been unchanged since synfig was GPLed. Should we re-enable them, or do we need a better way to determining when the onion-skin frames occur relative to the current frame?

Hi Genete and Pabs

Answering Genete: Well, when I’ve said about the Synfig tools drawing problems, I wanted to mean that I have some problems to use then, not that they are no good, sorry. I need to stay in with the tools. But, as I said, I’ll certainly give a chance…it’s my first try with Synfig.

I read all the tutorials and liked then. I know about Synfig’s tweening capabilities, and I’ve tested too…very good.

Answering Pabs: Hi Pabs!! I’ll try to explain how I use the onion-skin… I use this when I am free hand drawing a character, and it’s very usefull because I can see all the poses I draw for a character movement. When we draw a character animation we draw all of the main poses of an animation, and then we draw the in betweens , so that’s very importante the onion skin in this process.

The freehand tool that I have with synfig is the sketch tool, but it does not create a frame-by-frame sketch for us to follow. When I create a cut-out-animation or a tweening animation, these frame-by-frame sketches helps a lot to position the vector drawings…Am I clear? Sorry I’m Brazilian and I’m trying to write as good as I can. So, those frame-by-frame sketches acts as a guide to the final animation…we can see the animation timing, how much frames to leave for the next pose, and the right pose to use. That’s very important.


About the new version installation, isn’t there any binary for ubuntu?? I read about compiling but I got confused.

Thanks.

Hi guys, sorry, I’m late with the project, but it’s going on…

I’m using blender to help with the perspectives and inkscape for some drawings.
Take a look at this scene, the building is not finished, but I wanted to test the light of the scene.

And, this is the test animation:

This is other references from blender:


Well, I working hard.

EDIT: Appearance of the text looked stupid. Removing stupid comments.

Hi my friend! Well, I modeled the building in blender, so it’s a 3D object. With this 3D object inside blender, I can rotate the camera freely, that’s why I can always have a good perspective.

The production process was:

  1. I just rotated the camera and positioned it as I wanted and after this, I rendered the scene.

  2. I opened the rendered image inside inkscape and vectorized the image, applying colors. After that, I exported the image as .png

  3. I Imported the image inside Synfig and composed the scene.

  4. the animated gradient background was made inside Synfig and the animated clouds too. The building could be vectorized inside synfig, I just used Inkscape because of the tools. But I prefer Synfig for the free freehand drawing . It’s great!

About blender…you can search in blender forums. It will be a hard work, and some tips from me will not help you…believe me!
we can exchange some information by e-mail. Mine is: ricolandia@gmail.com

Best regards.

EDIT: Couldn’t stand looking at this post, much less reading it…

Ok, let´s talk by mail and I´ll explain it to you. Here we are at Synfig forums and we must talk abou Synfig, ok?

Best regards!

EDIT: Stupid of me to have posted my email address…wtf could I have been possibly thinking? :open_mouth:

:open_mouth: :open_mouth: :open_mouth: :open_mouth:
Have you enemies at yahoo?? :wink: Very first time I hear that yahoo doesn’t talk to other mail servers…

EDIT: Removing stupid comments. That wasn’t me…

Hi Coolname007,

I sent you a e-mail now! Let’s test it!

Hundreds :smiley:

That’s ok now Genete, I sent him an e-mail and he answered, so it’s ok now. Thanks!
I’ll keep sending the animation progress here.

Hugs.

Genete, A doubt!! If I create an animation cycle inside Synfig, how can I transform it in a “forever” cycle. Example: A car wheel, or a bee wing.

Can you help me? Or anyone else?

Thanks!

You can use a Time Loop layer.
Basic Usage:
Link Time: The start time of the child layers where the loop starts
Duration: The duration of the loop
Local Time: Where the loop is offset according to the timeline.

See this for further information.
synfig.org/Time_Loop_Layer

In the simpler usage you have just to set the proper Duration and leave Link Time and Local Time both to be 0f.

Here is a working example:
youtube.com/watch?v=Yjsu6ycBrvg
The source file link is available in the information of the video.
It is very illustrative.
-G

Thanks Genete! I´ll try this. It will be too helpful.

Well …I tested, Very good!!! One more point for Synfig!!! Great!