I’m very new to Synfig, so just getting to grips with the basics. I made a brief animation which I was very pleased with, but when I saved it and went back to it, one of my keyframes had changed in a way that wouldn’t let me edit it.
The idea is that a single line outline morphs from shape A (at 36f) to a different shape B (at 48f) finally to shape C (at 60f). I drew shape A using a single spline, then edited that spline at 48f to make shape B, then again at 60f make shape C.
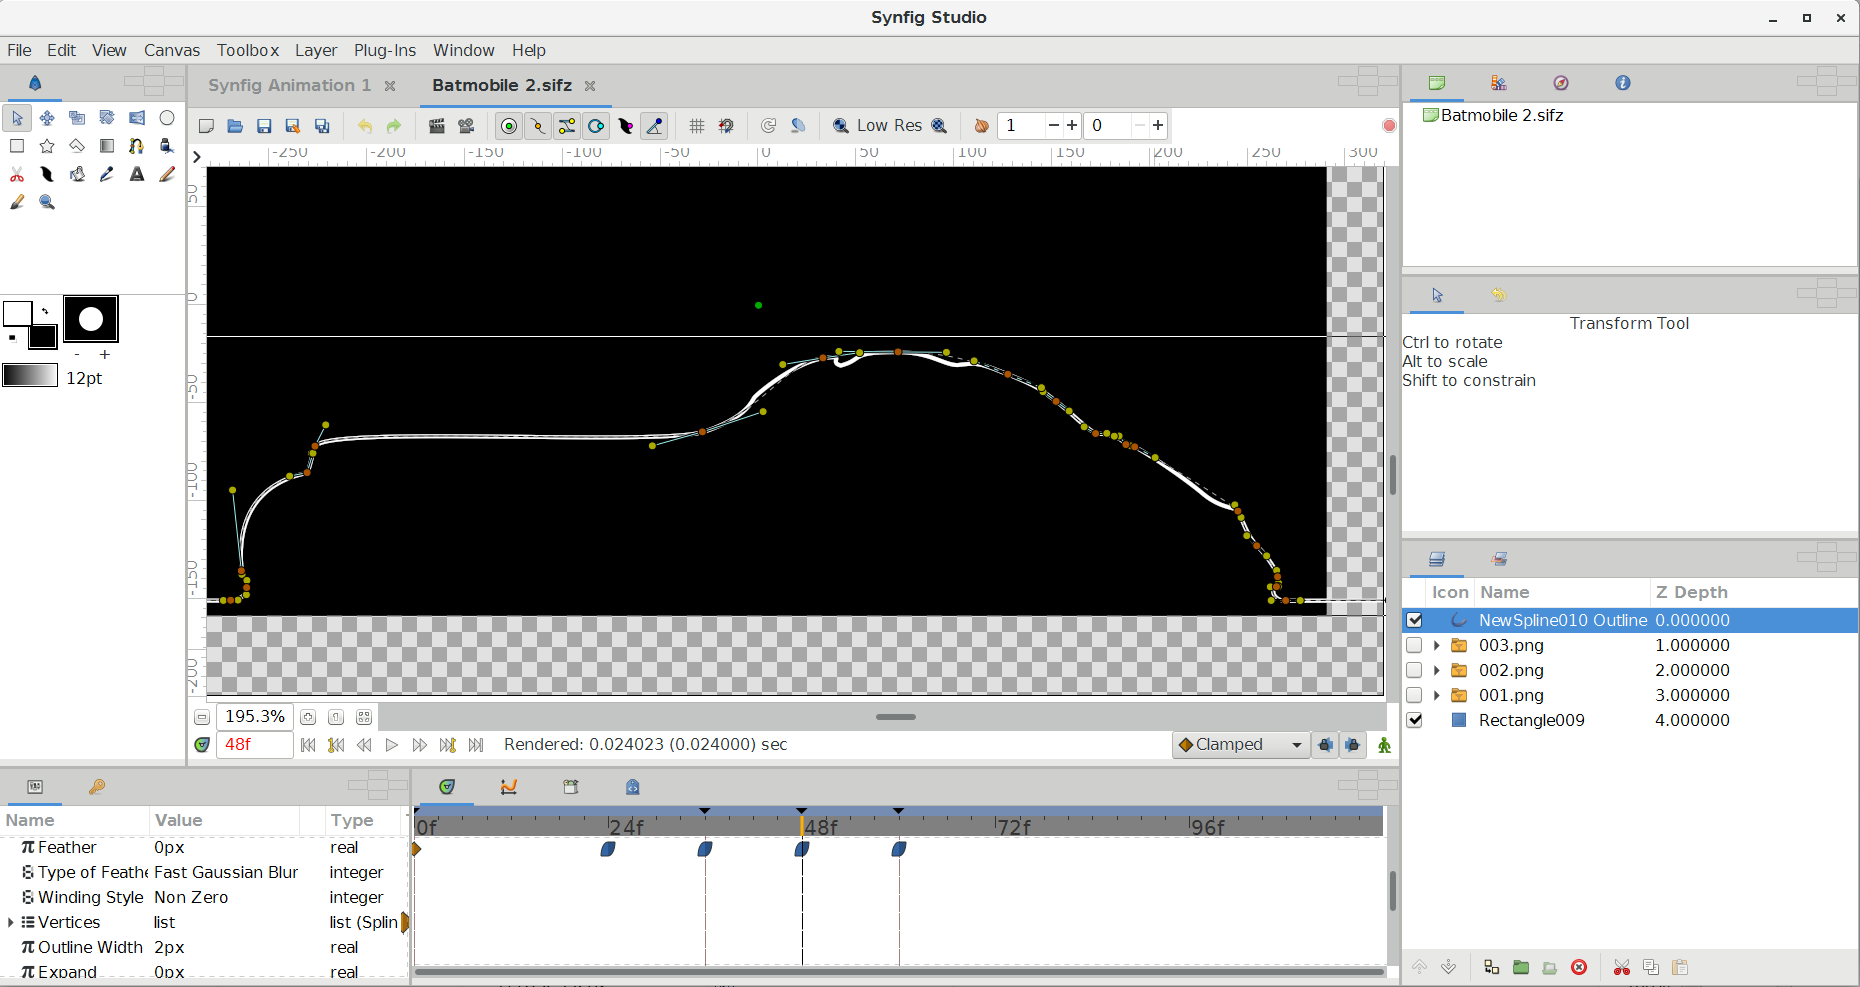
I’m sure it looked fine last night, but now I’ve reloaded my project, you can see from the screen shot that 48f is no longer the right shape. (Look at the roof particularly.) The white line rendered, does not follow the line of the path I drew for it, despite 48f being a keyframe. There’s also no nodes where it deviates to drag back into shape. (I’m aware that I could add some nodes to edit it back into shape, but that would be more of a bodge that might cause more problems down the line, rather a than proper fix.)
Frames 36 and 60 both look fine.
What’s going on? Why does my spline not follow the path, even though it’s on a keyframe?
I think it might have something to do with the fact I added nodes to the spline at 60f. (I’m calling them nodes. In the right-click menu it’s called “Insert Item”.)
When I changed the length in the Keyframes Window from 12f to 11f then back again, nodes appeared on the spline at 48f where the anomalies were, meaning I could doctor it back into shape. This is a messy and time consuming means to an end though, I’m still not happy and I don’t entirely understand what’s going on within the program. If I were to add a fourth shape at 72f, how much of my animation is going to be mucked up next time I reload it?
Maybe it’s just something as simple as the manner in which I’m adding the nodes? Any insight would be useful.
Okay, so this forum’s pretty dead. But I’ve managed to work around the problem, so I’ll explain how, just in case anyone with a similar problem finds this thread.
If you want to animate a spline where the number of points/nodes changes over time:
Each instance where the spline changes, make sure it is a keyframe rather than just a normal frame with waypoints. Just editing the spline at a certain frame doesn’t necessarily make it a keyframe. Make sure it is by clicking the ‘Add Keyframe’ button that looks like a plus sign (+) in the Keyframes tab in the bottom left window.
When adding a point/node to the spline, do this by right clicking on the spline and selecting ‘Insert item.’ There is another option that says ‘Insert item & keep shape.’ I’m afraid I’m not sure of the exact difference between the two options, but I’d recommend using the former, it seemed to give me fewer problems.
If you want to reduce the number of points/nodes, DON’T use the menu option that says, ‘Remove Item (Smart.)’ This permanently deletes that node across all frames, so can actually delete details from earlier frames. Instead, just deactivate the node using ‘Mark Activepoint as “off,”’ and the node should disappear somewhere between this frame and the previous keyframe without affecting anything else.
If you follow the above, but adding points/nodes still seems to be messing up previous frames like in the screenshot in the OP, there is a workaround. I’m not sure why it works, and it’s a bit scrappy, but it does the trick. Go to the first keyframe where the unwanted spline artifacts have appeared, (this should hopefully be just the previous keyframe, providing you’ve made sure all your waypoints appear on keyframes,) and in the Keyframes Tab of the bottom left window change the length of the keyframe. It doesn’t matter what to, just change the value to a higher number, press enter, then change it back. For some reason, this makes points/nodes/vertices appear where the unwanted artifacts/distortions are - these will likely coincide with the the number of points/nodes you’ve added in the subsequent keyframe. These points/nodes can then be deactivated, or dragged back into shape, hopefully returning that keyframe to its intended appearance.
Save frequently, and under different names, in case any of your actions has unexpected consequences across previous frames, you shouldn’t lose too much work.
It’s taken a couple of weeks, but I think I’ve worked out what’s going on. (Once again, this forum’s been useless, but I’m going to type out my findings rather than just saying “Nvm fixed it,” just in case anyone else has this problem.)
(Tl;dr at bottom.)
Basically, I think it’s a bug, or maybe a series of bugs that means when you add points/nodes/vertices to a spline/bline at a certain point in the animation it will add those vertices into the previous frames in a weird sort of limbo where they are both not active (cannot be edited) and active (affect the visible shape of the spline) both at the same time.
So, say you add a vertex to a spline but for some reason when you return to a previous keyframe, the spline is now messed up in an un-editable way, just like in the screenshot in the OP, that’s because the new vertices are there, changing the shape of the spline, you just can’t see them or edit them.
You need to find them, and activate them, and then do as you see fit with them to strong-arm your damn animation back into shape. To do this, you need to return to the frame where the unwanted anomalies first appear and find the offending points/nodes/vertices in the parameters window, (the window in the bottom left with two tabs: parameters and key frames.) The invisible point you’re looking for will be numbered somewhere between the numbers of the adjacent vertices that are visible on the line. When you click on a vertex in the parameters window, it highlights in red in the canvas window. When you click on the missing vertex you want, this obviously won’t happen, because it isn’t visible in the canvas window. Once you’ve found it in the parameters window, right-click it and activate it using “Mark activepoint as ‘on’” in the right-click menu.
The missing vertex will are now be there in the canvas window to kick back into line.
tl;dr: If your spline seems to be being distorted by unseen forces, chances are there’s some “hidden” vertices affecting the shape. The can be found and activated in the parameters window.
Hello Dave,
I just tried to replicate your problem and it seems to be an issue if you insert a new spline point while still in animation mode.
If you turn off animation mode before you insert a new point it is shown correctly at all times.
But if you insert a new point while in animation mode and not at frame 0 for all previous frames the new point will be invisible but still affecting the rest of the spline.
This truly seems to be worthy of a bug report because experimenting with it resulted in the program crashing (version 1.2.2). (Do you want to do it because you found it or shall I?)
Also I’m sorry this forum hasn’t been very helpful for your cause (saying it politely),
I only recently got active here and I do my best to be supportive.
Hi Dave & Estard
thank you for filling in detail
Yeah the forum is dead dead dead but the creators do pitch in sometimes and it is the only place I found that CAN answer probs.
I what Synfig is supposed to do but it’s so unstable (on my win10 platform anyhow) that I save after most every change and keep increments - 0.01 0.02 0.03 or 0.03a 0.03b 0.03c sort of thing (my best is 127 backup files for 1 project) - in case the file corrupts. It is hard learning enough to be helpful here before all your hair is torn out! even bald I believe in the project and learn when I feel strong enough for the battle:laughing: so basically when I’m on holiday coz I don’t have the time or strength when I’m at work.
Be strong everybody the only way this will be a stable strong brill piece of software is if people use it.
SAL
Sorry for the passive-aggressive tone in my earlier posts. This is a great piece of software, especially considering it’s made by a handful of people who are working for free.
@Estard Thanks. If you are willing to report it as a bug, then please do. You probably have a better grip on the terminology and exactly what’s going on than me. Ta!
@LinuxLass It’s like anything with a learning curve, it can be frustrating at first. I never had any intention of learning how to animate properly, I just had this one simple line morphing thing I wanted to make, that I thought would be really simple. When I asked how to do it, most people directed me to OpenToonz. I could barely draw a line in OpenToonz, and it didn’t even give as much control over the tweening as Synfig did in the end. Why anyone would recommend that to a beginner is beyond me. But as you said, Synfig is/can be a great piece of kit. Introducing yourself to animating is a difficult step, but Synfig feels like a familiar and natural next step, especially for people who’ve used GiMP. It’s a lot more intuitive than OpenToonz for those who’ve never animated before. I might never animate anything again after I’ve finished this little project I’m working on, but if anyone asks me, I would recommend Synfig, definitely.
Don’t worry yourself, I’ve been crying with frustration and swearing Synfig right left and centre this year (first year I found it) but when it works it’s a beauty. My boss started to get me to Gimp some things and then shooed me into trying Synfig. The bit I find most difficult is the technical writing in the wiki and I would love to feel good enough to get my sleeves rolled up and get some of those pages spot on.
You are so right, this is an amazing product especially for something that’s made by just a few people. It has to be a real real tiring thing to maintain and have people come by (me frinstance) an d bitch about it crashing all the time. It can be an arty piece of kit but then you get all the stuff you can twiddle in the parameter sand it is a whole new ball of wax! Very me. Totally it. These are some smart smart people.
ok so I have been a week finding out about a job that should be like 20 mins coz the render engine seems a bit dicky but job done at last and I can move on.
Good luck with your thing. Never tried OpenToonz and I don’t want another black run learning curve!
SAL
 what Synfig is supposed to do but it’s so unstable (on my win10 platform anyhow) that I save after most every change and keep increments - 0.01 0.02 0.03 or 0.03a 0.03b 0.03c sort of thing (my best is 127 backup files for 1 project) - in case the file corrupts. It is hard learning enough to be helpful here before all your hair is torn out! even bald I believe in the project and learn when I feel strong enough for the battle:laughing: so basically when I’m on holiday coz I don’t have the time or strength when I’m at work.
 it. These are some smart smart people.