I am new to this whole world of animation.
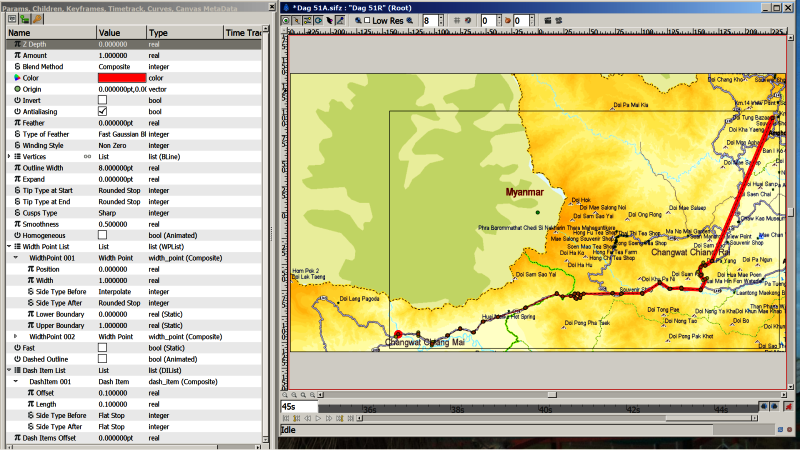
All I want to do (at present) is to make an animated Map with a dot (car) moving on the map and highlighting the traveled route.
So far I have the dot traveling on the road, even unevenly as I as I had to insert Keyframe every time the road turns, I have not been able to highlight the traveled road.
Anyone have an idea
Hello and welcome Anders!
You Can Do this in few ways. Either with the advanced outline where you animate the width the line or animating a mask revealing the line.
Attached is one example file.
The advanced outlines has the option for dashed segments and I think that the default one is ok for your design. If you need help with this, please ask. In any case you can make your own dash combination. To enable dashed outlines you have to mark the ‘Use Dashes’ parameter.
The exposure is made in this way:
The WidthPoint Lists has initially two WidthPoints which are enough for a line exposure.
You have to place one of them at the line start
The other must be placed very close to the other at start of the line.
Then right clicking the widthpoint duck on the bline (you have to show the width ducks first by doing ALT-5) you get some contextual menu. Select Set Side After to be one of the Rounded, Squared or Peak types but don’t select Interpolate. This way the rest of the line from the second widthpoint to the end is not shown due to that the side type of the widthpoint stops it.
Then in animation mode animate the position of the second widthpoint and you will get a revealed dashed outline like in my example.
I hope it helped.
Cheers
-G dashed-line-exposed.sifz (1.29 KB)
I am getting closer, but I think I might have started out with a wrong line because when I try to convert I cannot find Set Side After (see screen shot in attached file.
I played with your file and there I got the Set Side After first time but was not able to repeat it?
Probably you have modified the width duck in animation mode. Please check that the Width sub parameter of each WidthPoint is not animated and that both have the same value. If it were animated you can un animate it by right click the parameter and selecting “Disconnect”. It will turn to be a constant value again.
You can modify the animation length using the File->Edit Properties menu command and in the Time tab of the dialogue, select the End time to be bigger.
Once done that to extend the animation you have to add some animation waypoint further the last animation change. To do this you need to be in animation mode and modify the proper parameter with the time cursor at the right time.
-G
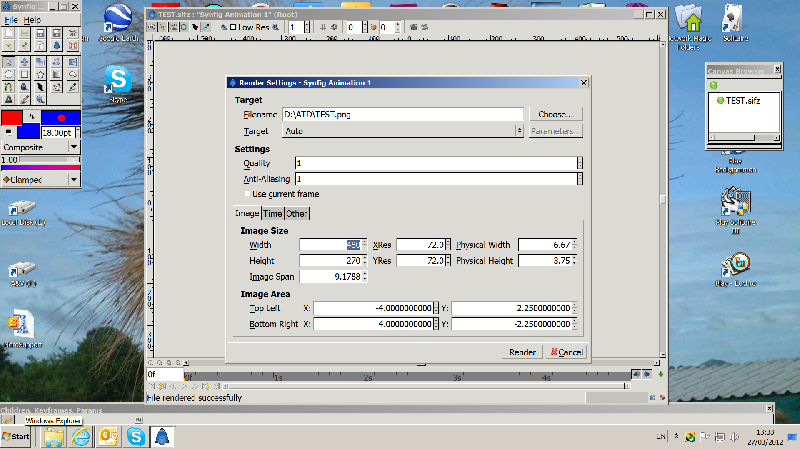
I am now animate well, but I have a problem when I am rendering the files.
It came out with the imported background (map) quite blur.
I use a PNG file as input at approximately 3-4 Mbit, but my output PNG is only 30-100 Kbit hence the low quality.
I have set different Quality 0-9 and Anti-Aliasing 1-31
I have also tried Jpeg and Gif formats but with the same results.
Brgds
Anders
Your using a canvas/render size of 480x270 which is quite small images. As a reference old PAL tv-format is 768x540 and full HD is 1920x1080px.
If you use a larger output size your final image quality/size will be much better.