I’m working on something different right now. I’m trying to make an anime-style head turning animation (not-so-smooth frame-by-frame animation). I was thinking of using constant interpolations, but then i realized that using clamped (default) ones with fewer number of frames and small adjustments of FPS might do the trick just fine.
Oh, also…
Any idea how to disconnect only one outline’s vertex point from its region?
I can only do it by disconnecting the whole vertexes at once from its region and now i’m kind of stuck (again)
When you create a region and an outline, what is linked together is the whole list of spline points, so there is not two spline points linked together to split, instead each spline point is the same and unique for both layers.
Maybe you can request that when region and outline are created together, what is liked are the individual spline points created, so that way you can disconnect one of them only.
-G
I did a little bit of workaround lately by making an opened spline (with its outline), then making another open spline, but only for the region and linking both vertex points’ ends and both spline’s origins.
Short explanations, i was merging two “C” into one big “O”.
And then another trouble comes (oh boy…)
I was trying to hide a group of eye behind the head region by playing around the Z depth parameter, but i tried about an hour and still nothing changes. Even after checking the tutorial (and looked into some scattered files around the forum) i still don’t quite get it .
UPDATE:
Ah, i get it!!
The Z depth only works in the same group and will not work in stacked groups. I was making the layer groups like this:
head
-eyes
–eye1 (z depth changed)
–eye2
-head region layer
and nothing changes. So i broke the eyes group apart like this:
head
-eye1 (z depth changed)
-eye2
-head region layer
and it worked great finally
A little bit disappointed because i can’t put the eyes in one big group though .
I also don’t know what Z Range (and some other ones below) does. Please let me know if anyone do
Yup!! Something like that
So my assumption was correct then.
I just updated my own latest post about that.
I don’t know why, i always do that every time. Just to avoid posting pointless spam-looking post.
And after i edited it your post pops up in the thread (ouch…)
sorry…
Umm… not exactly what i’m looking for but worth a try. Might be really useful to make a pose switch.
What i actually mean with my last question is some parameters that i saw at the bottom when you group a number of layers which is the ZRange (along with its Position, Depth, and Blur parameters). I did playing around with them a while ago and i think i quite get it. Still…
Well, i guess you’re right. But again, even the tutorial pages needs some more changes.
Okay, back to the topic again. I’m having a really horrible issue right now
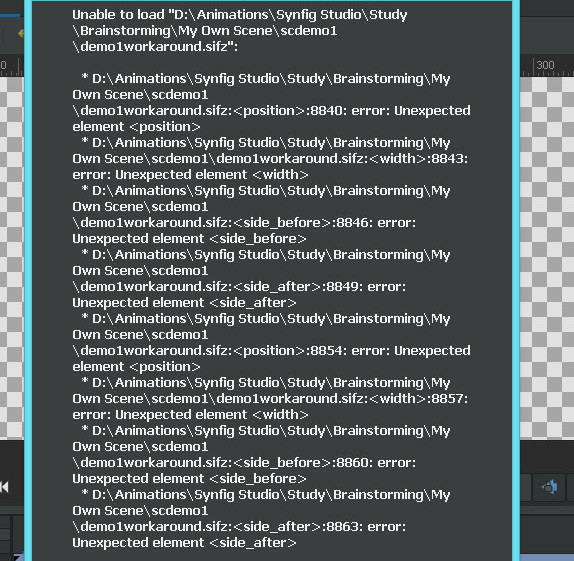
I took a day off yesterday from studying the anime head turning. And now i was going to start again and trying to load my animation files. Then this happened :
I really don’t know when. Last time i was playing with Z depth and everything was fine. It even saved the file with no issue.
And the worst part is, i don’t have a proper backup, which means i might have to go back to square one…
i really need to take a break… (and some help)
UPDATE:
I took a bit more inspection to the error message right after posting this and i think i know some of the culprits to this issue
The ones that says “width” probably comes from the super sample layer.
I was using two of them in different groups because the “two C’s to one O” trick turns out didn’t end up very smoothly because of this wiki.synfig.org/wiki/Sewing_Spli … n_line_bug
And one of the advices was to use the super sample layer and set the width and height parameter to 3x3 or 4x4
For the position ones, it might be the z depth issue, but still no clear yet
And for the rest (side_before, side_after), still have no clue
Also still unable to recover my file yet.
Might update here later. Helps are welcome
Have you changed the Synfig Studio version in the middle of the process?
It looks like the saved file format is not compatible with an older version of Synfig.
If on contrary you’re opening a file created with a previous version of Synfig Studio, with a newer version of Synfig Studio it is clearly a bug.
Finally, if you didn’t do any Synfig Studio version change then there are two options:
The file wasn’t properly saved on disk (hard or software faliure)
That Synfig Studio version has a bug that doesn’t allow to open a successfully saved file.
In any case you can always try to edit manually the file by doing this:
Rename your file from “myfile.sifz” to “myfile.sif.tgz” The extension “tgz” tells to the OS that it is a compressed file.
Now use your convenient application to uncompress the file to “myfile.sif”
Then you can edit it on a text editor. It is a XML formatted file so you can edit and fix each section easily.
Search the places where the messages appeared and fix it.
If everything above fails share the file and let someone else repair it.
I haven’t changed its version since trying to making this animation.
Um… I do have a kind-of portable Synfig Studio RC-1. Not exactly portable. I just installed the RC-1, copy the whole folder to other disk and changed the installed version again back to v1. But i never used it. It’s just there in case i accidentally putting the guide in and saved the animation without even knowing it, since in v1 it’s just crashing if the guides moved to anywhere.
Well that might be likely the reason
I don’t know why but it seems either i’m using Windows 8 or it’s just my compressed file extractor software itself got messed up, it extracted my file format from “filename.sif.tgz” to “filename.sif.tar”. I don’t even know if that supposed to happen.
Anyway, i’ll put the file here if anyone willing to fix it. It actually have 2 png images imported in (both are keyframes) but i decided not to put them in yet. Let me know if they’re necessary as well.
Aaah! That’s actually a bug that allows to convert a Width Point list (composite) into a simple plain Width Point list and there is not code written to read such kind of lists. Same happen if you disconnect a Width point from the list.
Rename your file from “myfile.sifz” to “myfile.sif.gz” The extension “gz” tells to the OS that it is a compressed file.
Now use your convenient application to uncompress the file to “myfile.sif”. Unrar for windows will do the job.
Then you can edit it on a text editor. (Notepad++ is excellent for that) It is a XML formatted file so you can edit and fix each section easily.
What I did was to create a new file with an Advanced Outline and save it as .sif. Then edit it at Notepad++ and search the WPList section. Copy the entire section to your file and it is fixed!
-G
Oh my goodness!!! It opened!!
Thank you so much. You saved my day!!
Oh yes! I did see that when i was playing around with some random outlines and region (different files). I was trying to disconnect the outline’s vertex point from its region from the list by disconnecting them. But it does nothing, and when i double clicked the disconnected vertex point it says some text like “No (something)”. I forgot the whole text reading.
Hmmm… It seems that this bug has been submitted since last 2 years ago, and still no progress on fixing it. Really old bug yet persistent one.
Is there any way to prevent this issue, such as putting warning message then cancels the action or anything ? (i know nothing about coding, though. Sorry… )
Yep!! And now it’s really Fixed ^^
This should be in “Advanced Troubleshooting Tutorial” section (if they have one ..v )
Okay, is anyone know how to work out the hair strands and z depth at the same time?
It seems that i have to work on it one by one… (and it’s pretty tiring)
UPDATE:
I just tried constant and it seems doesn’t look satisfying enough. Maybe the best way is to use all of the necessary interpolations altogether.
I don’t know. I little bit advice would be nice
Whew… Sorry for no updates in this thread in such a long time.
For the last three weeks (a.k.a one month) i had some problems irl (including a terrible illness in my first and a half week). And yet still getting blank on the hair strands that i’m trying to work on
Well anyway, i’m in for a question:
What would be the best possible way to make frame by frame animating easier. I’ll need it because i’m trying to achieve some kind of anime-esque movements in my animation.
I was going to do so. But i think i’ll just put it here for now in case someone have some tips for me. Besides, the question seems a bit similar to this (headturn animation anime style).
I might add another topic about it once i’m finished with this headturn mess
After many times of procrastinations and failures, i managed to create a good layers set for my headturning animation. The folders set still needs a bit more perfection but even right now it looks usable for the head, and possibly for other body parts along with its details. . But i won’t go too far for now.
Sorry for letting this thread dusty for a month. I’m pretty much a really lazy guy . But here’s a result of the mock-up
Drawing hair is not too difficult, except if you want some shadows and good-looking strands. And i’m pretty much looking for that kind of hair unfortunately. So, instead of drawing the whole hair, i just draw a single strand, just to give you some figures of it (and like i said, this is still a mock-up but with a better progress).
I’ll try to figure out the hair for the next one, then other body parts hopefully.
Note for rendering :
Everyone should read this first beforehand wiki.synfig.org/Render_dialog
I just rendered this to gif before and somehow it glitches. Then i twiddled it again 3 to 4 times with still a glitchy result. I finally found my mistake after reading that wiki. For rendering the animation you should try with Quality = 3 first. And my mistake was changing it to 1, 4, and 9 (somehow) without knowing the consequence, making it really glitchy.
Oh, and just to be safe put the Target parameter in Target to Auto and write the file suffix in the file name on your own.
One more question : The thumbnail is super messed up here but the gif looks normal when viewing it in new tab. Please explain the reason and the solution.
I’ve got stumbled a bit when removing all waypoints to remake the template. I saw some annoying waypoint icons in my time track. It looks like TCB icon but it’s all grey and black. I can’t delete it at all (even right clicking on it does nothing ). So i examined the whole child layers and re-converting every single spline points in it to its default type
(Spline to spline, DIList to DIList, WPList to WPList, etc.) and somehow those grey icons are all gone.
What are those ? Is there any easier way to delete it ?


 . But i won’t go too far for now.
 . But here’s a result of the mock-up

